Browsed by
Category: tutorial

How to install Friendica with Yunohost

How to install Friendica with Yunohost

Friendica is a wonderfull and powerfull social network you can install easily yourself with just few lines of commands.

This is not a detail way how to do it. But just a missing part of the official documentation.

You have a server with yunohost. If you don’t know how to install yunohost go the official documentation of yunohost. But I can give you how to do it in 2 lines

  1. Install Debian
  2. Connect with ssh to your debian server and type
curl https://install.yunohost.org | bash

Prepare a domain or subdomain for your friendica

Admin > Domain > Add follow the instruction …

Then Admin > Application > Add

Just let yunohost working…. Have a tea…

The documentation explain “For admin rights: When installation is complete, you will need to visit your new hub’s page and login with the admin account username which was entered at the time of installation process. You should then be able to create your first channel and have the admin rights for the hub.”

Now I will translate this misterious sentense.

You must know the email of yunohost admin and have acces on it. I did a redirection because I don’t need yunohost email.

Then create and account with this email (admin of yunohost). You will receive by mail a password. Then you can access to you friendica and have administration.

Sometimes it is important to close registration.

More information about Friendica

Using Yunohost save you time. It configure for you all the server and the domain. You can use Friendica for you family, your group or for yourself. You will be able to communicate with the whole Fediverse, with Twitter and many other plateforme.

If this tutorial helps you just tell it on the comment. By the way you can add this blog in your contact if you already have a fediverse account (Pleroma, Mastodon, Hubzilla etc…) Just add kris@kris.aga.ovh and you will be allowed to comment directly from your fediverse account.

Have fun


2021-10-23

Important additional information : Friendica does not work with this kind of installation. I didn’t investigate more why and how to fix it. I already installed Friendica with the classic installation and it works well. But with Yunohost It simply does not work. I create 2 account and impossible to add an account from the same instance.

If you installed Friendica with Yunohost do you have the same problem?

How to install PowerShell on linux

How to install PowerShell on linux

Powershell is THE system language of microsoft. If you are IT worker, you SHOUD know this language. It is a good investment to learn it. You have so many languages to know but this one should be mandatory because one day you will need it.

Now as a linux user, I wanted to continuer my learning with my favorite opérating system. Linux have BASH scripting language by default and powershell is a microsoft language.

But as you notices Microsoft is not the evil company as it used to be. You can have Windows Subsystem for linux (WSL) on your windows system.

Then now how to install it ? Just type this line of command.

sudo snap install powershell --classic

Now how to use it ?

pwsh

if you want to go out and return on the default command :

exit

How to comment a pixelfed photo from your mastodon account

How to comment a pixelfed photo from your mastodon account

If you have a mastodon account, you probably know that you are using a powerfull and amazing tool because you can communicate with all mastodon instances. But there is more…

You are able to communicate with the whole Fediverse. You can follow peertube video channel, communicate with pixelfed contacts or even comment wordpress post all from your Mastodon account.

If you have other kind of tool, pleroma, hubzilla or other that works the same way.

Pixelfed is an photosharing tool like instagram. You can publish photos and share it. It is federated that means that all the fediverse can follow, comment or like.

Now I will show you how to comment a photo from Pixelfed without Pixelfed account simply from your mastodon account.

I have a mastodon account @kris and a pixelfed account kris@/pixfed.com (you note the same kind of address similar than email). Each account have 2 kinds of address

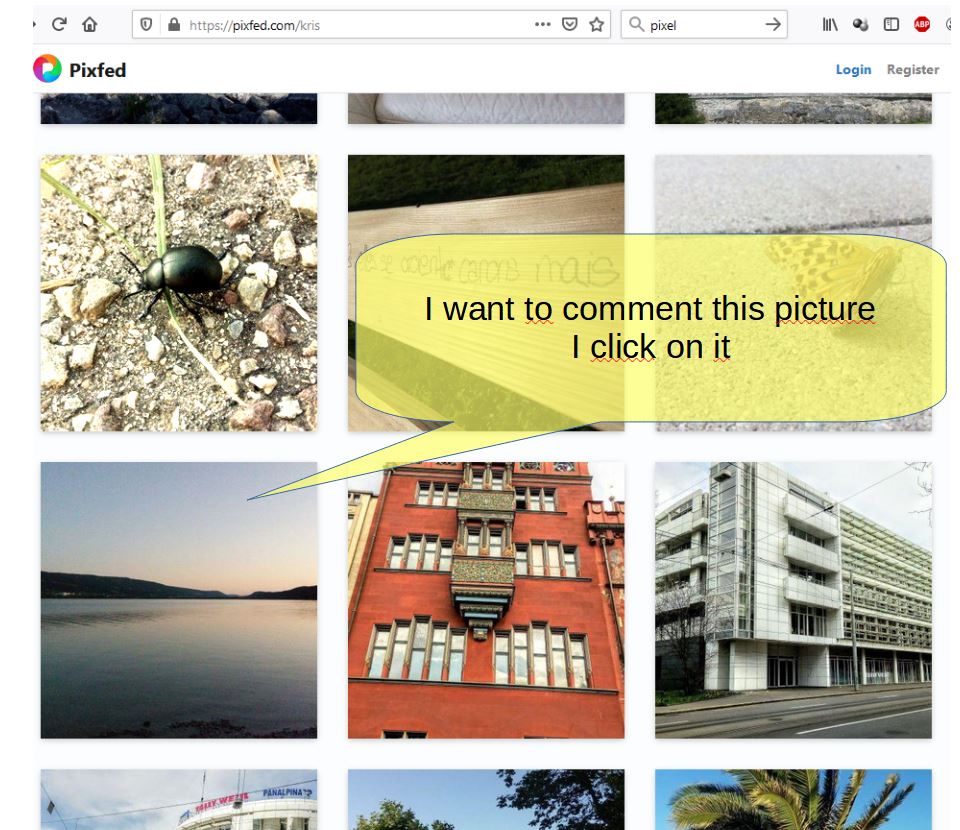
Now I want to comment a nice photo I saw on the album.

Now I will show you how to comment this picture in 4 steps.

  1. Copy the url of the picture (CTRL + C)
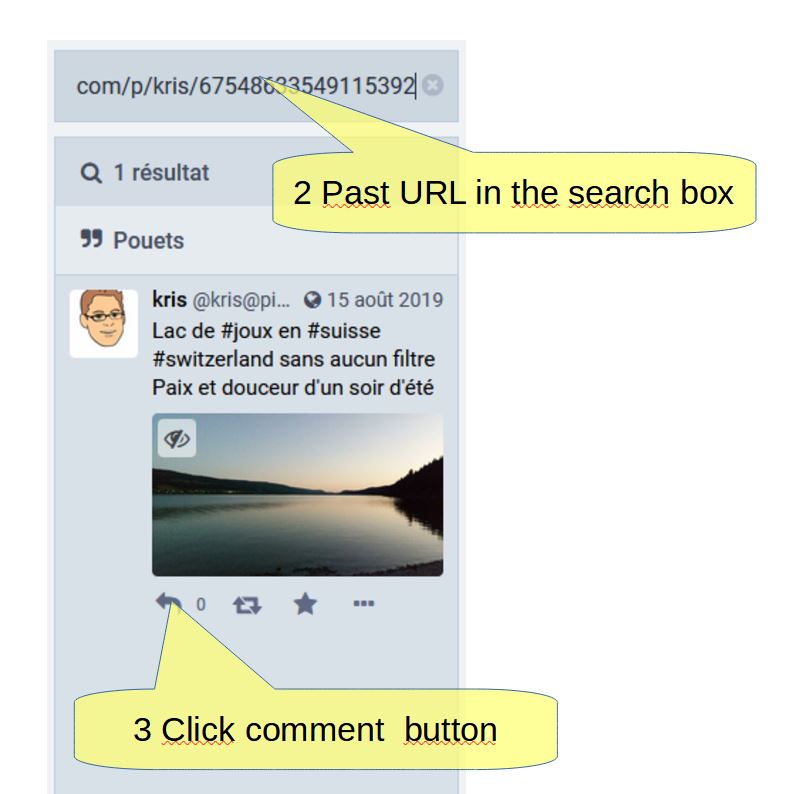
  2. Past the url in the search box (CTRL + V)
  3. Click comment button
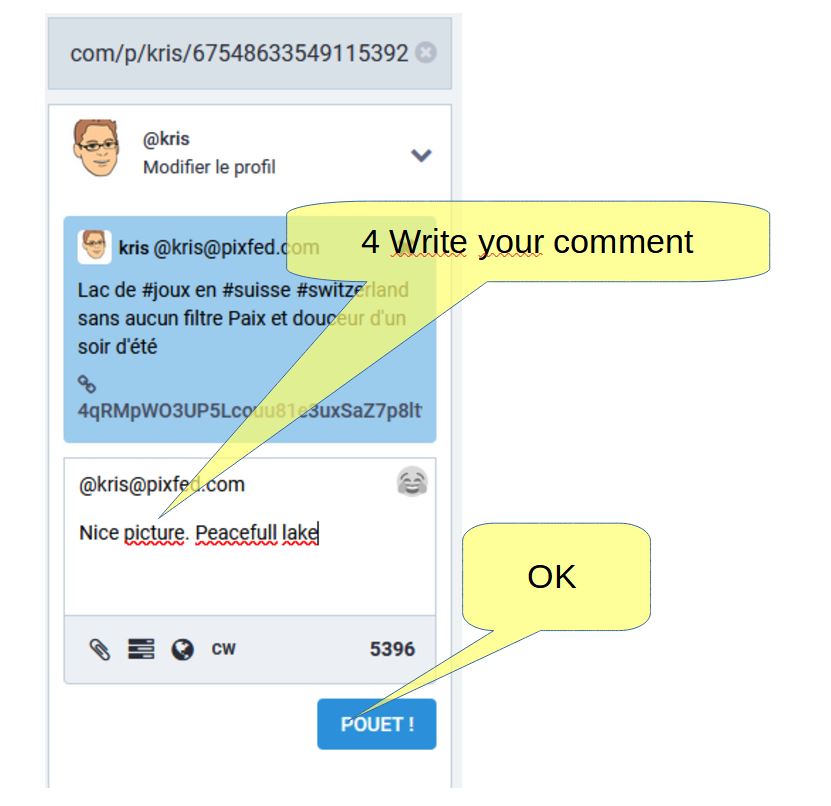
  4. write your comment then validate it.

1.Copy the url of the picture

2. Past the url in the search box

3. Click comment button

4. write your comment then validate it.

Now I have a question : How to reshare or boots a pixelfed photo on your mastodon account? You can reply on a comment here.

Second question : How to show you like a picture?

If you don’t have any Mastodon account you can register it on a public instance. Here is a list of public open instance.

How to move a multisite wordpress to a single side wordpress ?

How to move a multisite wordpress to a single side wordpress ?

This blog needs to be moved. He is presently hosted in an american webhost Dreamhost. This host is nice. You can have lot of web space. But sometimes workpress needs more power or the delay between Europe and USA suck.

So I decided to move it to OVH.

The limit of my OVHh host is the database. I only have one database and it is limited to 200Mega. I can put many domains so if you use many wordpress on one database prefix is needed. As I installed wordress with default prefix how to process.

Before doing the move work. I should know how to do it.


1. rename the tables manualy.


Rename table wp_commentmeta to new_commentmeta;
Rename table wp_comments to new_comments;
Rename table wp_links to wplabo_links;
Rename table wp_options to new_options;
Rename table wp_postmeta to new_postmeta;
Rename table wp_posts to new_posts;
Rename table wp_termmeta to new_termmeta;
Rename table wp_terms to new_terms;
Rename table wp_term_relationships to new_term_relationships;
Rename table wp_term_taxonomy to new_term_taxonomy;
Rename table wp_usermeta to new_usermeta;
Rename table wp_users to new_users;

2. manual change in table wp_options and wp_usermata

search in wp_option the value user_roles in the field options_name

SELECT *  FROM `kris_options` WHERE `option_name` LIKE '%user_roles%'
and change the prefix like new_user_roles
SELECT * FROM `kris_usermeta` WHERE `meta_key` LIKE ‘%wp_%’
Change all wp_ by your new prefix new_

3. copy the sources localy

By ftp copy all sources in a local directory.

4. copy the sources to the new site

5. Change the wp_config

define('DB_NAME', '...');

/** MySQL database username */
define('DB_USER', '...');

/** MySQL database password */
define('DB_PASSWORD', '...');

/** MySQL hostname */
define('DB_HOST', '...');

...

$table_prefix = 'new_';

After transfering the new wp_config by ftp. Your new site should be working on your new host.